|
Thanks to Jeremy Freeland of Bossoms Boat Yard Ltd for the Tuning Manual |
Chapter One - BOSUN SAILING THEORY |
CHAPTER 1 - BOSUN SAILING THEORY
General
- Firstly it must be stated that for a theory to be correct, it must work out in practice, which of necessity brings in the skill, ability and preference of the helmsman. This chapter is based on the experience of a number of successful helmsmen of the Bosun Dinghy. The aim is to provide the newcomer to the Bosun with some guidance and to give the more experienced a reference with which they may agree or disagree.
- In order to explain the finer as well as the more general points, it is assumed that you are going to borrow a boat that you haven’t sailed before and race it in a series with the object of at least putting up a good account of yourself. The reason that a race has been chosen is that the essence of racing is sailing at the greatest efficiency and any points learnt during a race may be useful whilst cruising.
-
-
Having uncovered the boat (make sure it is yours) check over the gear, ensuring that it is in sound condition and nothing is missing. The first step is to put up the mast, this operation is best done with the assistance of your crew; however if it should be necessary to do this single handed, the following procedure has been found to be relatively simple:
- Lay the mast along the boat, with the heel in the step and upper section of the mast extending aft over the transom, thread the forestay tail around the block in the stem fitting.
- Attach the shrouds
- Walk the mast forward, raising it until it is upright, secure the shock cord around the mast at deck level, tighten the forestay tail and secure it.
-
Once up, the final fiddling and adjustments may be made. As a basic position the mast should be adjusted so that it is vertical in the boat when viewed from astern, and raked aft slightly. To start with in order to get the rake correct, try the thickness of a finger (3/8 of an inch) between the bulkhead (at foredeck level) and the mast.
-
The shrouds are tensioned by tightening the forestay on the rack provided, it will require both hands to get the tension right. Now, and this is very important, the shroud attachments should be checked for security, bottle screws should be locked with wire, shackles tightened, and clevis pins split pinned to prevent them falling out.
-
Having ensured that the mast won’t fall down, the jib is clipped onto the forestay and the main sail threaded onto the boom. The battens are fitted into the mainsail; they should extend to the end of the pockets, providing a good fit. The flexible end of the batten should be inboard, and the softest battens in the top pockets
-
The jib is now hoisted and tensioned, using the down haul and rack, once again using two hands. Each make of jib requires a different setting, a useful starting point is to line up the mitre seam with the sheet lead to the cam cleat. The tack should end up about two or three inches above the foredeck. After the jib has been tensioned, release the forestay one or two notches on the rack. This ensures that most of the strain is taken by the jib luff wire and allows a certain increase in rake whilst beating to windward.
-
Having moved the boat almost into the wind, the mainsail is fully hoisted with the gooseneck fitting loosened off. When the halyard is fastened, under tension, the gooseneck is pulled down until a crease begins to appear in the sail alongside the mast; at this point you have gone too far (except for heavy weather), so loosen off very slightly. It should be possible to flex the bolt rope ½ inch or so with two fingers.
-
Now adjust the clew outhaul relieving any downward pressure on the boom. The correct tension is that which gives the best sail shape, this is usually at a point where the horizontal creases appear parallel to the boom. Secure the outhaul and tension the kicking strap until the creases parallel to the mast and boom disappear.
-
The object of this rather detailed sail setting procedure is to get the following conditions while sailing:
- The sails to set in a smooth, crease free curve.
- The maximum fullness approximately one-third back from the mast (even further back in light airs but under no conditions further forward).
- The last one-third of the sail relatively flat.
- In general, a good smooth aerofoil section.
-
A few points to assist sail setting:
- The black bands on the mast and boom are the outer limits of the sails, for the purpose of class rules. They should not be used as marks for sail setting; in fact they will only be reached in heavy weather with a full sized mainsail, and many sails have been spoilt by people trying to reach the black bands with an undersized main.
- Tightening the clew will remove fullness from the mainsail.
- Tensioning the mainsail bolt rope will pull the fullness forward (towards the mast).
- Tightening the kicking strap will tend to bend the mast and remove the fullness from the mainsail. It will remove twist from the main but may cause unwanted creases in a badly stretched sail. If there is more than one kicking strap tension, which provides a good sail shape, then leave this adjustment until you are afloat.
- A crease in front of the batten pockets is due to the battens being too long, or more likely, too stiff at their inboard ends. This effect is particularly noticeable at the top batten where, in extreme cases, the sail takes up a kinked effect and the curvature is replaced by two flats. Beware of making battens too short however as this can cause the leech to become too ‘floppy’.
- If you still can’t get the sail to set to your satisfaction, there are a few dodges left which will be covered under the section on tuning.
-
At this stage, put up the racing flag, leaving the spinnaker until last; the reason for this is that it is very easy to go wrong as no doubt you will find out at some time or other. Because of this tendency it is wise to adopt a set procedure in the hope that you will eliminate embarrassing mistakes.
-
A few points that may help you are:
- When the spinnaker is hoisted out of its stowage, it and its sheets should be outside the shrouds, forestay and jib sheets.
- It should be free from twists etc.
- It should be simple to hoist.
- When stowed, the spinnaker sheets and halyard should not interfere with the normal sailing of the boat.
-
One solution is to hoist the spinnaker outside the forestay and jib; and led the sheets outside everything, to the after sheet leads. (Tie the sheets together or put stopper knots in). Then lower the spinnaker to one side and pull it into the boat underneath the jib sheets. Stow the sail into the stowage in the front bulkhead and using the slip just aft of the shroud, keep the halyard clear of the jib sheet.
-
The advantage of this method is that having been up correctly, the spinnaker is stowed and nothing is disturbed or disconnected. (What came down must go up – we hope). To aid stowage, most spinnakers have coloured seams: Red – Port, Green – Starboard.
-
At last we are ready to get the boat launched, just a final check over:
- Is the mainsheet free from twists and running freely?
- Have all the sheets got figure-of-eight knots in their ends?
- Does your crew know what to do?
- Are you certain of the course?
- Have you paid your entry fee?
- Have you signed on?
- Have you collected your safety tally?
- Have you got a protest flag?
- Have you got a life jacket, is it serviceable?
- Do you know what the tide will do throughout the race?
- Is the bung in?
- Is the rudder in the boat?
-
Launch the boat and fit the rudder and tiller. Ensure that the rudder is fully down and tighten the wing nut to remove any slackness. Now sail around to get the feel of the boat and take the opportunity to check the set of sails. If the kicking strap has not been finally adjusted, now is the time to do it. A simple effective way of doing this is as follows:
- Sail off onto a broad reach to check the set of the sail.
- Luff head to wind, haul in on the main sheet and adjust the kicking strap as necessary (to attempt this on any other point of sailing places unnecessary strain on the kicking strap, and the crew).
- Sail off onto a broad reach to check the set of the sail. Repeat this procedure until satisfied that the kicking strap adjustment is correct (usually this is when the mainsail leech appears to be nearly straight, ie minimum twist).
Sailing to Windward
-
When beating, the object is to get to a point windward as quickly as possible. This may be achieved in two ways:
- By pointing very high (ie close to the wind) and accepting the resulting loss of speed through the water.
- By sailing freer, therefore covering a greater distance but at a better speed through the water.
Which of these extremes is best depends upon a number of factors: wind strength, sea state, strength and direction of the tide etc. Failing the presence of a computer and instruments to measure speed, direction etc, some simple rules are required to achieve optimum performance. In order to devise these rules one must understand the principles of sailing to windward.
The Basic Rules for Beating to Windward
19. (a) The boat should be sailed upright, except in very light airs when the boat should be
heeled slightly to leeward. This helps the sails to hold their shape by their own weight and also reduces the hull wetted surface area, as does moving the crew weight forward.
- In order to get most drive from the sails, there is only one optimum angle between the
-
sail and the relative wind for any one wind strength (on a particular sail shape).
-
In order to get to windward in the shortest time, there is only one optimum angle
between the sail and the boat for any one strength of wind ( on a particular sail shape).
It may be seen that if the wind shifts whilst beating, for both points (b) and (c) to be corrected, it is no use sheeting in or out. One must change the direction the boat is pointing, keeping the sail/boat angle (c) constant and re-establishing the sail/wind angle (b).
In Practice
20. In practice, the above is achieved by cleating the jib, hauling the main in the desired amount, and sailing by use of the tiller. As a reference, the leading edge of the jib is kept just prior to stalling by slowly pointing the boat closer to the wind until a point on the jib (usually just above the mitre seam, about 2 inches back from the luff wire) tends to lift to windward. If the sail actually lifts to windward, then you have gone too far into the wind. You must bear away slightly, and start to come up into wind again. This action produces a hovering about the optimum sail/wind angle (Principle (b) ), which will lead to that hard-to-describe ‘feeling’ that is transmitted through the tiller.
- In order to obtain the best sail/boat angle, (Principle (c|) ), the jib should be pulled in fully, but not so tight that the fullness of the jib is being lost (more precise details later). If you have a superhuman crew, check this point; some of them aren’t satisfied until they have part of the sail showing through the fairlead. Pull in the mainsail so that in light winds the lower third of the leech stands up to windward, as the wind increases allow the boom to go out over the quarter, thus opening up the lower part of the leech and inducing twist higher up; as the wind increases and the boom is allowed to go out, it is important to retain the kicking strap tension.
- To keep the boat upright (Principle (a) ), the crew and helmsman will have to shift their weight constantly, and if the wind is strong, the helmsman may have to ease the mainsheet as a temporary measure, until the crew sits out or the boat is pointed higher into the wind (to ease the heeling moment).
-
To tie the three points up:
-
Whilst beating in heavy weather, if the wind swings aft (frees), initially the boat will start to heel. This is corrected by easing the main and sitting out further. The tiller is pushed to leeward; as the boat responds and the heeling moment is reduced, the main is pulled into original position, and the swing of the boat (to windward) is corrected by pulling the tiller to windward.
-
We end up (we hope) with the boat upright (a), the same sail/wind angle (b) and the sails in the same position relative to the boat (c). What has changed however, is the direction which the boat is pointing. If the wind swings the other way, the reverse action should be taken
-
So, it can be seen that, in certain circumstances, the helmsman will be playing the mainsheet, his tiller and weight in order to maintain the three conditions.
-
To assist helmsmen to play sheet in heavy winds, an extra purchase can be taken on the main sheet tackle.
In Very Light Airs
-
The most important (and often the most difficult) point about light weather sailing is to find out where the wind is coming from. It is advisable to have light tell-tales on the shrouds and on the leading part of the jib, and the helmsman and crew must look carefully for external wind indicators, smoke from a chimney ashore or from vessels afloat, catspaws on the water etc. If the helmsman or crew is a smoker, then this may be used to advantage to indicate the wind direction. The plate should be fully down and the crew’s weight well forward.
-
It may be necessary to heel the boat some 10 degrees further than the optimum. (0 to 5 degrees) to leeward, in order to get some shape into the sail. The crew can be of great assistance by not distracting the helmsman’s concentration yet remaining interested in his surroundings. The jib should be let out ½ inch – 1 ½ inches from tight, to ensure a full section. Finally, don’t pinch, sit still concentrate and watch for wind shifts. The crew can sometimes help by holding the boom over to leeward.
Medium Airs
-
The jib should be eased ½ inch from fully tight, plate down, and crew’s weight well forward. The crew should check that the curve of the stem is just submerged.
Heavy Airs
-
The main problem in heavy airs is keeping the boat upright and maintaining forward speed. As the boat heels, the bow tends to swing windward (weather helm). Correction of this tendency by use of the tiller causes further heeling, the rudder acts as a stalled hydrofoil and causes a braking effect. The crew should be sitting out fully with loose toe-straps to get maximum effect. They may also have to move aft slightly to prevent the bow from submerging excessively. To ease the heeling moment, the boat should be pointed high into the wind and the sails flattened by hauling then in tight and tightening the kicking strap. To reduce uncontrollable weather-helm, pull up the centreboard fractionally; this moves the underwater pivot point (centre of lateral resistance) aft.
-
Finally, whilst beating in heavy weather, flatten sails, anticipate the windshifts, sit out hard, pinch if necessary in order to keep the boat upright. Absolutely plumb upright, there is no easy way out, the boat must be upright, so work hard and keep the boat level and the mast upright.
Conclusion
-
You will find it generally better to keep a Bosun as close to the wind as possible except in very rough conditions when it pays to bear away to achieve the necessary speed to drive through the sea.
Sailing off the wind
-
The main difference between sailing off the wind and beating is that whilst reaching or running, you can point the boat directly where you wish to go, then adjust sails, centre-plate, crew position etc, to reap maximum benefit from the wind.
The Basic Principles of Sailing Off the Wind
34. (a) The boat must be sailed upright.
(b) In order to get the most drive between the sails, there is only one optimum angle between the sail and the relative wind for any one strength of wind (on a particular sail shape).
It may be seen that, if the wind shifts while sailing off the wind, all you have to do is to move the sails relative to the boat in order to keep the sail/wind angle constant (Principle (b) ).
In Practice
- In practice, a straight course is sailed and the above sail/wind angle is obtained by easing out the jib until it starts to lift (as it did when you luffed the boat whilst beating). Once again if the sail actually lifts, the crew has eased out too mush sheet and should pull the jib in slightly. It is constant letting out and pulling in (or playing) of the jib that gives a hovering about the correct sail/wind angle. The jib should not be cleated whilst sailing off the wind.
- With the jib correctly set, the mainsail is eased out until it starts to be backed by the jib (the first third of the main starts to lift to windward); at this point, pull in the main slightly. Because the main is set from the jib, it can be seen how important a good crew is whilst sailing off the wind. Not all of the centreplate is required to prevent making leeway, so pull the plate up as far as possible until only a trace of weather helm is felt, but not so far as to diminish the ability to steer.
-
Running and Reaching in Light Airs
-
Whilst running or reaching in light airs, the points regarding smoking, sitting still and concentrating apply. The crew should be sat well forward in order to minimise wetted surface and also to rake the mast forward. On the run, goosewing the jib, get the crew to sit to leeward and steady the boom. It will also help if the boat is trimmed to windward, so that weather helm is reduced by more evenly distributing the sail about the boat’s centre line. Only sufficient plate to prevent crabbing is required. In very light airs raise the rudder blade. Be sure to lower it again before starting to beat or you will crack the rudderstock.
Running in Heavy Weather
-
Most of the points appertaining to running in light airs apply to heavy weather except that the crew will have to be a lot further aft in order to prevent the bow from burying and more plate will be required. If the boat starts to roll, pull in the mainsail lower plate and move aft (to get a wider, flatter section of the hull in the water and to lift the bow). A tighter kicking strap will help to control roll by reducing twist in the mainsail.
Planing
-
The secret of planing is; keeping the boat upright, drive the boat hard, set the weight of the crew well aft and not making any violent movements whilst actually planing.
Getting on to the Plane
-
To deal with the simple aspect first, the helmsman should sit on the side deck about level with the rear thwart, whilst the crew is best positioned astride the centreboard box and sitting on the centre thwart. As a gust hits the boat the helmsman leans out whilst the crew will be leaning against the helmsman’s legs and on a reaching plane he will have to be on the side deck, sitting out.
-
As experience is gained, the helmsman should look for the gusts coming on the water, anticipate them. Warn the crew, and have the boat set up ready to plane before the gust arrives. In this way the maximum benefit is obtained from the gust.
-
To keep a boat level when a gust hits you, apart from sitting out, one can ease the mainsheet, but this causes a loss of drive. The best approach is to ease the mainsail slightly and bear away. This actin puts you on to a broader reach with less heeling moment.
-
The maxim is: Keep the boat under the mast. As you get on to the plane, the boat speeds up and the apparent wind will move forward, so be ready to pull the sails in slightly, especially the jib.
-
The correct amount of centre plate is important because excessive plate will cause difficulty in keeping the boat level whilst not enough allows the boat to slide sideways and absorbs the extra drive from the gust.
Once on the Plane
-
Beware of making large or violent movements. To keep the boat upright, use the mainsheet for small or instant adjustments and the tiller to make large corrections, remember, if the boat heels leewards bear away, if to windward luff up, ie keep the boat under the mast. If the crew can’t see the jib, or is too frightened to look, the helmsman should yell instructions as well as the routine abuse. A good plane in hairy conditions depends upon a firm hand at the tiller, a certain amount of force skilfully applied, and confidence. This confidence can only be obtained by experience and practising when the going is really rough; at the same time you can brush up on your capsize drill. It is vital that the crew reacts quickly to wind shifts, if the boat heels to windward on a plane, the helmsman is invariably somewhere just aft of the rudder and in no condition to perform rapid balancing manoeuvres.
Spinnaker
-
The actual drill for hoisting and lowering the spinnaker is one of personal taste, but whatever method is adopted it needs to be quick, safe and reliable. One well tried method is as follows:
-
The halyard is permanently attached to the head of the spinnaker. The sheet and guy are led to the after fairleads and tied together. The spinnaker, when not in use, is stowed in the front bulkhead, with the halyard kept out of the way, using the forward ‘snap in’ spinnaker fairlead.
-
The elastic topping lift is attached to an open hook, also attached to this hook is the terylene downhaul, the lower end of which is fed through a tubular cleat mounted on the mast. The spinnaker pole has an eye midway between the two plunger type end fittings (which are interconnected with a line). These fittings are arranged so that the mast fitting and spinnaker tack are hooked from underneath (plunger on top).
-
Prior to hoisting, the halyard is released from the ‘snap in’ fairlead and the spinnaker hoisted direct from its stowage by the halyard (if it has been stowed correctly it will go straight up with no twists). Once the halyard has been made fast, the crew fastens the pole to the spinnaker tack, hooks the topping lift/downhaul on to the pole, pushes the pole outboard and fits the inboard end to the mast.
-
The guy (the one to the pole) is led through the front ‘snap in # fairlead, without removing it from the after fairlead, and is cleated in the vacant jib sheet cleat. The crew can now take over the spinnaker sheet leaving the helmsman free to deal with the mainsail and tiller.
-
The spinnaker pole should be adjusted so that it is at right angles to both the mast and the wind; this will present the largest area of sail in clear wind. The sheet is then eased until the luff of the spinnaker is just curling inboard, at this point the sail will be pulling with maximum efficiency. It may help if the spinnaker halyard is eased a little to get the spinnaker away from the mainsail and thus prevent back-winding. Generally, it is of doubtful value to carry the spinnaker unless the wind is on or abaft the beam.
-
Whilst carrying a spinnaker on a reach, more centre plate will be required than the corresponding reach without a spinnaker. This is due to the increase in side force which will cause leeway. In order to compensate for the extra plate you will have to sit out further.
-
As the tension on the rigging as a whole depends on the set of the jib, it is inadvisable to lower the jib when setting the spinnaker, unless there is some obvious advantage in doing so, eg a very long dead run.
Lowering the Spinnaker
- To lower the spinnaker:-
- Remove the pole
- Gather the foot of the spinnaker from the clew.
- Pull the spinnaker down under the jib sheets and stow it.
- Stow the halyard and pole
NOTE 1 The spinnaker is preferably lowered to leeward but may be taken down to windward if the boat is running and the sail will be required on that side when next hoisted.
NOTE 2 The tack may be released
NOTE 3 Whilst hoisting and lowering the spinnaker, the helmsman can assist the crew by pointing the boat as far downwind as possible.
Tuning
The reason for tuning a boat is to produce a harmonised relationship between sails and mast, the hull and the crew. To get most from the boat, each of these three factors must be at top efficiency. These aspects will be considered individually to start with.
Sail and Mast
- The sails and mast must be considered as one unit because any bending or moving of the mast will affect the sails. The basic rigging of the mainsail and the jib was dealt with earlier on, however there are some additional points that may be useful.
- A full section is required for reaching.
- A flatter section is required for beating.
- A flatter sail section is required in heavy weather than in light airs (to reduce heeling moment).
- In heavy weather the fullness in the sail is moved aft, especially on the bet, by the action of the wind. This causes an increase in weather helm, however this can be counteracted by moving the fullness forward, by hauling down on the kicking strap and Cunningham holes to tighten the luff.
The Crew
- The crew must be fit and able to operate efficiently, for example: the toe straps should be adjusted so that the crew is comfortable yet as far out as possible, the ‘drills and routines’ adopted must be understood and suited to the crews limitations.
-
The Hull
-
Detailed improvements to the hull are suggested in Chapter 4. Assuming that you have completed these:
-
Before you start to tune the boat, you must evaluate the boat’s performance and it is for this reason that this section on tuning comes after that on various points of sailing. It will be necessary to decide if the uninspiring (or brilliant) performance was due to the sails, the hull, the crew or the relationship between these factors. If it is decided that it is the relationship which is at fault and typical symptoms are: the boat carries excessive weather helm, the boat feels dead, the boat won’t point to windward, the boat went well whilst beating but was slow downwind, or vice versa, then you can start tuning.
-
The process of tuning is one of trial and error, with certain guide lines to direct what action should be taken.
-
Whilst beating, a slight amount of weather helm is desirable. This means that if the tiller is let go, the boat would be balanced in such a manner that it would head up into the wind (centre of pressure of the sails is aft of the centre of lateral resistance). The reason that this weather helm is desirable is twofold (a) to get lift to windward from the rudder (without stalling it), and (b) to provide the helmsman with a definite ‘feel’ so that he can sense the boat’s balance.
-
If the general performance of the boat is poor or the boat feels dead it is probable that the mast rake is incorrect. The rake requirements for upwind and downwind sailing are different and a solution must be found which enables both points of sailing to be accommodated with equal efficiency.
-
One solution is to slacken the standing rigging while keeping the jib halyard tight. As the mast rocks back the jib luff will be tightened, thus preventing it from sagging to leeward while beating. Offwind, the mast will rock forward thus improving the downwind performance. This is achieved by hoisting the jib with the mast in its extreme forward position. When the jib is hoisted, slacken the tail up the forestay so that it has about 3 inches of slack then resecure.
Odds and Ends
-
There are numerous sailmakers who provide Bosun sails most of which have different characteristics. The best advice that can be given to the novice is to seek advice from a good competitor who uses the same make of sails.
-
In general a flat mainsail should be matched with a flat jib and vice versa but flat and full sails should never be combined.
-
The fullness of mainsail compared with the fullness of the jib will affect the position of the centre of pressure, ie with a flat jib and full mainsail the weather helm will increase, therefore to get the boat well balanced the mast will have to be raked forward.
-
If a Cunningham eye is not already fitted, this is easily done and can be of great assistance in heavy weather, especially when beating to windward. It consists of a reinforced eye 4 to 5 inches above the tack. Through the eye is passed a length of line, the free end of which goes through a cleat. When beating, this line is pulled down, transmitting tension to the luff thereby pulling the fullness forward and also flattening the sail. (If you don’t understand why this is desirable, re-read the beginning of the section on tuning).
-
All sails should be measured and signed by a recognised measurer.
-
On completion of sailing in a stiff breeze, wash the sails in fresh water (not only when you capsize).
-
Fold or hang up the sails; if folded, make sure that the creases will be along the line of the airflow.
-
If the boat sails better on one tack than the other it is probably due to an inherent fault in that the jib halyard is lead to the starboard side of the mast and, under tension tends to make the mast bend to port more than to starboard. This can be alleviated by securing the halyard in front of the mast with a cord tied between the spinnaker pole rings and then leading it down to the tensioning rack. Only a short length of halyard is then left to compress to the spar. Additional points to check are:
Asymmetrical main sheets (most Bosuns without sheet horses have this fault)
Unequal length shrouds
Bent mast
Twisted rudder
Twisted or bent centre plate
Conclusion
-
In conclusion, rely on expertise not luck, because far too much in racing is attributable to luck.
-
Learn the Racing Rules and how to apply them without becoming a ‘rule bosun’.
-
The meteorological expert will have anticipated a ‘lucky’ breeze that the ‘other’ boats got (and made sure that he was in a position to benefit from it).
-
The good helmsman doesn’t get himself into a position where he will lose places if the boat in front capsizes.
-
Fittings don’t often fail on a well prepared and often inspected boat.
-
Before relying on the rules to prevent himself from being balked, the good helmsman evaluates the other competitors knowledge of, and likelihood of obeying the rules.
-
Sailing covers all the aspects that affect a sailing boat, therefore luck can be virtually removed with knowledge, experience and most of all anticipation.
-
Still, good sailing and the best of luck, figuratively speaking of course.
CHAPTER 2 - CAPSIZING AND TOWING
CONTENTS
Para
Capsizing 1
When you capsize 4
If the boat is inverted 5
If mast fouls mud 6
Being towed 8
Capsizing and Towing
Capsizing
If you capsize, stay with your boat
- Bosun dinghies contain sufficient built-in buoyancy to support both boat and crew when completely filled with water. It is extremely dangerous to leave a floating boat and attempt to swim for the shore. If all attempts to right the boat fail, stay with your dinghy and await rescue, it’s far safer
- Two points remembered before you set sail can make all the difference
between a ‘successful’ capsize and the embarrassment of being
rescued, laughed at, commiserated with or just plain drowned.
- Always wear a lifejacket
- Always carry a bailer attached to your boat by cord.
- When a Bosun capsizes it will often float on its lower buoyancy tank and can quite often be righted and sailed within seconds. Be very careful to avoid losing your boat and your reputation when righting. A Bosun will often get under way as soon as it is upright with or without crew. Make sure you are with it!
-
When you Capsize
-
When you capsize, the RYA approved righting drill is extremely effective for getting a Bosun back up and sailing again. This drill may be summarised, step by step as follows:
- Helm and crew drop onto water between boom and boat, each checks verbally that the other is all right.
- Helm swims aft and holds onto rudder, crew frees mainsheet and passes it to helm, crew then swims aft to rudder.
- Crew holds rudder, helm using mainsheet as a lifeline swims forward to centre plate, and by holding centre plate prevents boat from inverting.
- Crew swims forward between boom and boat, frees highside jib sheet and throws it over the boat to the helm.
- Crew lies in boat on the side deck with one knee and one shoulder inside the boat.
- Helm climbs up the boat’s bottom, using the jib sheet and bilge rail. (NOTE it is not necessary to stand on the centre plate).
- As the boat comes upright the crew will be scooped up with it. Once up, the helm holds onto the side of the boat, crew frees jib and mainsheets and assists the helm to climb aboard.
- Sort out the sails, bale out the water and sail away.
If Boat is Inverted
5. (1) Get out from underneath
- Push the boat head to wind, pull jib sheet through fairleads then helm and crew stand on gunwhale or bilge keel on the opposite side to the fairlead and using the jib sheet haul the boat up until the mast is lying on the surface of the water.
- Helm, using jib sheet holds the boat in this position, crew swims round the boat, lowers the centre plate (taking care NOT to hit the helm with it), then right the boat as above.
- HELM and crew drop into water between boom and boat – communicate
- HELM - holds onto and checks rudder
-
CREW – free mainsheet, pass to helm
-
HELM – uses mainsheet as lifeline swims to centre plate
CREW – holds rudder
-
CREW – throws high side jib sheet to helm
-
CREW – lies in boat on side deck one shoulder and one knee inside boat
(6) HELM - climbs up using jib sheet and bilge rail
NOTE : If you must stand on centre plate, keep your feet close to the boat – or you will cause damage
- HELM – hold side
CREW – free jib and mainsheets rock boat and help helm inboard sort out the sails, bail out the water and sail away
If Mast Fouls Mud
This operation must be carefully carried out, haste here can quite often end in rather loud explosive noises. If your mast is definitely stuck:
- Clear jib and spinnaker sheet jamb cleats.
- Cut or cast off the mast erecting tackle and the jib downhaul.
- Fold the mast aft.
- Right the boat the in the same way as that detailed above.
- If a rescue boat is sent to help you, remember to advise the coxwain to approach you from your lee so that it does not drift down onto you, risking fouling of gear or yourselves on the screw etc.
Being Towed
8. (a) When joining a tow, make sure your halyards are cleared away for lowering the sails.
Join the tow from ahead, letting it overtake you as you edge in. The tow has orders not to stop, so don’t make a mess of joining it.
(b) When being towed by a line from another boat, take dry turns (ie no hitches) round the mast or sailing thwart and keep the end to hand.
- When towing a boat astern, take dry turns around the midships thwart, and lead the painter in over the quarter. DO NOT make fast to the sailing horse or your own stern painter (you may carry away the horse or strain the transom). DO NO lead the other boat’s painter in under the sailing horse, as he may sheer off to one side and capsize you.
- Raise the centre plate or you will probably capsize when the tow gathers way.
- If the boat becomes bow heavy she will be difficult to control so keep aft when being towed.
- Unless the tow is very short, say under ¼ mile and the weather is very calm. Sails should always be lowered to avoid making the boat unmanageable and to stop them flogging which wears out the stitching.
- Steer so that you are slightly on the quarter of the boat ahead and such a position that you do not interfere with his steering.
CHAPTER 3 -CARE AND MAINTENANCE OF BOSUNS
CONTENTS
Para
Hull Repairs 5
Stem 6
Keel 9
Keel Band 15
Bilge Keels 16
Transom 19
Manufacture of Replacement 21
Transom Capping 27
Spray Chines 28
Spray Chine End Plugs 29
Gunwales 30
Thwarts 32
Care and Maintenance of Bosuns
This chapter is intended as advice on elementary hull maintenance and relatively basic hull repair procedures which as far as is known is not specifically documented elsewhere.
- The hull of the Bosun dinghy is extremely strong and robust, however the polished surface is fairly easily removed if the boat is dragged over rough surfaces, left rubbing alongside a pontoon or otherwise abused ashore. Most small scratches may be removed by rubbing down with a fine abrasive and applying a proprietary GRP polish. Deeper scratches require filling with GRP putty, rubbing down and polishing. When boats reach a certain age or are so badly marked that it is necessary to paint them they should first be thoroughly rubbed down, all scratches and marks filled and again rubbed down and then primed and painted with a recommended GRP paint.
- The wood work on the Bosun should be kept well varnished, this does not require a lot of effort, the area involved is not large and a few hours rubbing down and applying a couple of coats of varnish is well worth while. Too often one sees Bosun dinghies with neglected varnish work and even bare wood. This looks unsightly, but far more important leaves the timber totally un-preserved and permits water to soak in.
- The built in buoyancy of the Bosun needs no maintenance but it does require care. Although the buoyancy does not absorb water, it will if kept wet hold water; this is not sufficient to significantly affect the buoyant properties of the buoyancy, but is sufficient to add up to 25lbs to the boat’s weight, a very significant factor in keen competitive racing. To prevent this, always stow the boat so that water may drain from the buoyancy compartments and if possible allow the boat to thoroughly dry out in a warm shed periodically.
-
Hull repairs
-
For various reasons the wooden trim on Bosuns does occasionally require repair or replacement, the following replacement procedures have been found effective.
Stem
-
To remove the damaged stem, first unscrew the keel band in way of the stem. This is secured by ½ inch x 4 gauge brass countersunk head screws. The damaged wooden stem may now be removed by undoing 3 in number 2 inch x ¼ inch (50mm x m6) machine screws, which are inserted into backing plates moulded into the GRP stem.
-
The timber used for the replacement stem should be Mahogany 2ft 6inches x 1 ¼ inches (700 x 150 x 30mm) Replace the machine screws and studs ground or filed to a point, so that the points project outwards from the moulding clear of the forestay fitting. Offer up the replacement stem in a fair plane with the keel and foredeck; a sharp blow with a mallet should embed the points of the three studs into the back of the replacement stem. Remove stem, drill pilot holes (1/8inch) square to the back of the stem at the three marked positions through to the front face. From the front face of the stem counterbore the three holes with a ½ inch (12mm) drill sufficiently deep to bring the heads of the machine screws just below the surface; open up remainder of the holes to ¼ inch clearance.
-
Locate the replacement stem using the original machine screws, a shallow rebate will have to be worked at the back of the upper end of the stem to allow it to fit over the forestay fitting. The shape of the hull moulding may now be marked onto the back of the stem, remove the stem and shape to this marked line. Replace the stem and shape the leading edges. Before finally fitting the stem, the back face should be coated with three coats of marine varnish. Fit the stem, where it comes into contact with the gunwales, it should be well coated with white lead paint. Tighten the machine screws, fill the heads with putty, sand the stem to a fine finish and apply at least three coats of marine varnish. Re-secure the brass keel band.
Keel
-
Removal of damaged keel can be effected by unscrewing from the bottom of the boat, removing the keel band (4 sections) and exposing 3 in No machine screws at the fore end which fit into steel backing plates moulded into the GRP which are to be undone. 2 in No 1 ½ in brass c/sk/hd screws fasten the keel to the transom boundary at the after end and can now be removed.
-
All other fastenings securing the keel to the hull are undone from inside the hull. 17 in No stainless steel screws 1 in x 10 in G and 4 in No brass c/sk bolts in way of the drain plug at the after end. Care should be exercised in the removal of these fastenings to make sure that the brass and fibre washers are not mislaid, these are to be replaced, the metal washers to distribute the strain of fastenings over a larger area of the hull than the head of the screws allows, and the fibre washer to maintain a watertight seal.
-
The keel is to be of UTILE or MAHOGANY 3 ½ in x 7/8 in (8.9mm x 2.4mm) fitted to the stern and running the full length of the boat. The fore end is fitted with a doubler increasing the thickness to 1 ½ in (4.8mm) at the stern, and allows the increased width at the cut up to be covered. The keel soon reduces back to 7/8 in (2.4mm) in thickness aft of the cut up. The doubler is to be bonded in place using a waterproof glue (such as Aerolite) together with c/sk brass screws fitted from the underside.
-
A centre line is run the full length of the keel and the position of the recess for the drop keel is noted. The recess can be readily cut out ½ in (12mm) wide by drilling a hole at either end and the remainder removed by saw; if care is taken at this stage, a lot of cleaning up at the recesses sides can be spared at a later stage. Both sides of the keel are levelled off along its full length and edge of the keel is not to be less that ¼ in above the surface of the GRP; ideally it should be left at 3/8 in so that the same bevel can be worked in way of the doubler.
-
It will assist the repairer in keeping a fair shape is a mould of the original shape is made from any suitable material (Plywood, Perspex or Hardboard) and is applied from time to time as work progresses.
-
When a fair shape has been obtained throughout its length; pointed studs can be used as a means of locating the positions for the two machine screws at the fore end and holes bored to suit, keeping the heads of the machine screws so that they fit below the external surface of the keel. Hole to be drilled through the keel in way of a drain plug. The whole keel is then given three coats of marine varnish which is to be completely dry before fastening into place. Care should be taken to replace any fibre washer that may be damaged and if possible a thin smear of white lead paint on the underside of the wood where it comes into contact with the hull to help keep the boat watertight.
Keel Band
-
Banding is to be of flat brass strip ½ in x 1/8 in (13mm x 3mm) worked in 4 lengths, I length worked from the top of the stern to the fore end of the centre plate or drop keel cut out 2 pieces, I piece running each side of the drop keel recess. I piece from the after end of the drop keel recess to the transom. Fastenings are brass c/sk screws ½ in x 4G.
Bilge Keels
-
Removal is undertaken from inside the boat; seven fastenings for each rail, the end ones in each case are 2 in x ¼ in (50mm x 6mm) machine screws with the nuts let well home into the rail. The remaining 5 fastenings being 1 ¼ in x 12G stainless steel round head screws. Under the head of each fastening should be both a metal and fibre washer. Timber used for replacement bilge rails to be either Utile or Mahogany 1 ½ in x 1 3/8 in (40mm x 30mm) the length of which should not exceed 4 feet. (The dimensions quoted are those of the finished shape and due to the reduction in depth at the centre of each rail when spiling in an allowance of 3/16 in (30mm) must be made when ordering the timber. (Starting size is 2 7/16 in x 1 ¼ in (70mm x 30mm). The inner surface of the rails is spiled in to suit the shape of the boat and the whole faired in. The outer surface is then cut parallel 1 ½ in (40mm) to inner face. The bulbous profile is then shaped away so that a minimum length of 3ft 7 in of the bulbous profile remains.
-
Position of the securing holes can be marked by offering up the rail into position and marking through existing holes in the hull from inside. The fastenings at each end of the rail can be bored right through and a ¾ in diameter nut let in well below the surface of the wood. The completed job is to be protected by 3 coats of marine varnish before being finally secured in place.
-
Both machine and wood screws are to be fitted with a metal and fibre washer before being driven home.
Transom
-
The transom proper is made of ½ in (12mm) marine ply sandwiched between GRP; however there is a transom rubber, or boundary made up of mahogany veneers.
-
Removal is progressed with the undoing of 7 in number 1 ½ in x 10G round headed screws from inside the hull, these screws are fitted with brass and fibre washers that have to be replaced. 2 in number 1 ½ in x 8G brass c/sk screws are fastened through the boundary into wooden chock pieces bonded in with the transom (3 each side) from the rubber downwards. After these are unscrewed, the transom boundary can be readily removed.
Manufacture or replacement
-
This necessitates the making of a mould to the shape of the now exposed transom, 2 layers of 7/8 in ply will give the necessary support. Pockets to be cut out 1 ½ in – 2 in (40mm –50mm) in from the edge of the mould to facilitate the fitting of the ‘G’ clamps to hold the veneers in place.
-
Cut strips of Mahogany 1 ¾ in (45mm) wide to a thickness of ¼ in (6mm) of sufficient length to go right round the moulded shape, a depth of 1 1/8 in (28mm) has been reached.
-
If steaming facilities are available this will greatly assist the task of bending the timber. Hal an hour soaking in a kiln with pressure of 4lb/sq in is ample and provision must be made to get the timber round the mould whilst hot.
-
If no kiln is available the wood may be left to soak in any depth of water for a period of 12 hours or so and the timber bent round the mould and clamped into place.
-
Whichever method is used, allow timber to dry out completely before gluing up; a waterproof glue of the Resorcinol type is to be used. Setting time of the glue is dependent on temperature and it should be allowed to cure fully before releasing the transom boundary from the mould.
-
The boundary can now be fitted to the transom and should be trimmed flush to the existing lines of the hull. Fastenings from within side the hull are to be fitted with metal and fibre washers. These are fitted from outside to have their heads sunk well home. The whole of the woodwork should be preserved with marine varnish.
Transom Capping
-
Made of Utile or Mahogany section 1 in x ½ in (25mm x 13mm) with the upper edge rounded to fit flush with the laminated covered transom, secured in place by 8 in number 1 in x 8G brass c/sk screws.
Gunwales
-
Made of Utile or Mahogany – 1 1/8 in x 1 in (28mm x 25mm) in one continuos length.
-
REMOVAL – by undoing c/sk wood screws along its length which are spaced at 12 in (300mm) intervals excepting in way of the shroud and sling plates, where ¼ in (M6) machine screws are through bolted into plates bonded into the GRP hull. The glued scarf joint in way of the transom boundary will have to be gently eased away. Replacement is quite straightforward and if work in fastening up is progressed from the fore end, the gunwale will not be too difficult to mould to existing hull form.
Thwarts
-
2 in number made of Utile or Mahogany 6 in x 7/8 in (150mm x 20mm) fastened at their outboard ends into Mahogany blocks moulded into the GRP. Fastenings are 2 in c/sk screws whose heads are set below the surface of the wood. Note that the forward thwart is fastened through the centre board case tubes with ¼ in diam machine screws and that on the underside are several rigging fittings that will have to be refitted and a replacement thwart should have its fore and after edges slightly rounded and be well protected with varnish before securing into place.
SPECIFICATION OF BOSUN SAILS FOR MINISTRY OF DEFENCE
1. General Requirements
1.1 All sail dimensions are to be in accordance with the sail plan Drawing no.941 200, and are to be measured in accordance with the international Yacht Racing Union rules and specification unless stated otherwise.
1 .2 All edges of all materials are to be cut and sealed using a laser cutter or a hot knife.
1 .3 Each sail shall be signed by the measurer and shall bear the date of measurement and the manufacturer's name in the vicinity of the tack. Weatherproof ink is to be used for this purpose.
2. Specification of Materials Mainsail and Jib
Mainsail and Jib
2.1 The mainsail and jib sail cloth shall be manufactured from continuous filament polyester (polyethylene terephthalate) with a standard resinated finish, and shall be supplied in-dark blue. The cloth shall be uniformly woven in plain weave and the selvedges shall be firm and straight. The shade of the cloth shall be uniform and shall match that of the relevant standard pattern.
2.2 The cloth shall comply with the requirements of tables A and B when tested by the methods quoted therein.
Table A Physical Requirements
| Property | Requirement | Method of test |
| Width | 90 cm min | BS 1930 |
| Mass | 155 g/sq m | BS 2471 |
| Threads Warp | 44 per cm min (125 denier) | BS 2862 |
| Threads Weft | 24 per cm min (250 denier) | BS 2862 |
| Breaking Load Warp | 1250 N per 50 mm min | BS 2576 CRL |
| Breaking Load Weft | 1700 N per 50 mm min | BS 2576 CRL |
| Tongue Tear Warp | 45N | BS 3424 Method 7B |
| Tongue Tear Weft | 45N | BS 3424 Method 7B |
| Bias Extension | 10 % max | Appendix A |
| Bias Residual Extn | 3 % max | Appendix A |
| 15 Minute Resl. Extn | 0.5 % max | Appendix A |
Table B Colour Fastness Requirements
| Agency | Minimum Rating for Colour Change | Minimum Rating for Staining | Method of Test |
| Light Washing | 6 | - | BS1006 (xenon) |
| (Sea Water) | 4 | 4 (Polyester) | BS 2682 |
Spinnaker
2.3 Spinnakers are to be manufactured from light blue ripstop nylon weight 46 grammes per square metre:
Width 1000 mm
Mass 46 g/sq m
Denier warp 30
Denier Weft 30
Thread Counts Warp 154 per inch
Thread Counts Weft 124 per inch
Sail Bag Material
2.4 The sail bags shall be manufactured from a durable open weave breathable nylon.
Battens
2.5 The sail battens are to be made from fibreglass with protective plastic endcaps fitted to each end.
3. Manufacture of Mainsails
3.1 The panels are to be cut at right angles to the straight leech. All seams are to be approximately parallel, stuck together using two sided tape, and sewn with one row of three step zig zag stitching with each complete step being no greater than 17mm. The thread is to be polyester and impregnated with Ultra Violet inhibitor.
3.2 All sail shaping is to be done by tapering the panel seams and curving the luff and foot.
3.3 All edge tabling shall be from the same material as the rest of the sail.
3.4 The luff tabling shall be not less than 60mm and not more than 70mm wide, folded in half containing a 7mm bolt rope or monofilament cord. The tabling shall be one continuous length of material with no joins in it.
3.5 The foot tabling shall be not less than 60mm and not more than 70mm wide, folded in half containing a 7mm bolt rope or monofilament cord. The tabling shall be one continuous length of material with no joins in it.
3.6 The leech tabling shall be not less than 35mm and not more than 45mm wide, folded in half, and may be joined at the end of each batten pocket.
3.7 Batten pockets are to be Y-section slot-in pockets sewn to the sail. The inboard end of the pocket is to be turned back on itself for not less than 100mm with mm. 20mm wide elastic sewn to the inboard end of the pocket. The outboard end of the pocket shall be hand sewn for the lower half of the pocket. The pocket shall be constructed to accept a batten with minimum a width of 15mm and maximum width 25mm.
3.8 Corner reinforcement patches are to be fitted in all three corners, and are to be layered using patch cloth of no less than 1 2oz (UK) as under patches, with a top. patch of the same material as the rest of the sail:
| Tack corner patch | 2 reinforcement patches plus 1 top patch | |
| Clew corner patch | 3 reinforcement patches plus 1 top patch | |
| Head corner patch | 2 reinforcement patches plus 1 top patch |
3.9 Two headboards are to be fitted externally, one on each side of the sail. The headboards shall be in either plastic or aluminium, fitted using aluminium rivets with a stainless steel headboard liner.
3.10 A Cunningham hole is to be fitted within 38mm of the forward edge of the luff rope, and 150mm above the the tack hole.
3.11 Tack, clew and Cunningham cringles are to be molybdenum stainless steel with an internal dimension of 14mm.
3.12 The insignia and numbers are to be in white self adhesive woven number cloth.
4. Manufacture of Jibs
4.1 The panels are to be cut at right angles to the straight leech. All seams are to be approximately parallel, stuck together using two sided tape, and sewn with one row of three step zig zag stitching with each complete step being no greater than 17mm. The thread is to be polyester and impregnated with Ultra Violet inhibitor.
4.2 All sail shaping is to be done by tapering the panel seams and
curving the luff and foot.
4.3 All edge tabling shall be from the same material as the rest of the sail.
4.4 The luff tabling shall be not less than 60mm and not more than 70mm wide, folded in half containing a 3mm stainless steel or plastic covered galvanised wire, with solid stainless steel thimbles at each end. The tabling shall be one continuous length of material with no joins in it.
4.5 The foot tabling shall be not less than 35mm and not more than 45mm wide, folded in half. The tabling shall be one continuous length of material with no joins in it.
4.6 The leech tabling shall be not less than 35mm and not more than 45mm wide, folded in half. The tabling shall be one continuous length of material with no joins in it.
4.7 Corner reinforcement patches are to be fitted in all three corners, and are to be layered using patch cloth of no less than 1 2oz (UK) as under patches, with a top patch of the same material as the rest of the sail:
| Tack corner patch | 2 reinforcement patches plus 1 top patch | |
| Clew corner patch | 2 reinforcement patches plus 1 top patch | |
| Head corner patch | 2 reinforcement patches plus 1 top patch |
4.8 The clew cringle is to be of molybdenum stainless steel with an internal dimension of 14mm.
4.9 5 plastic twist-on type jib hanks are to be fitted over the luff wire.
5. Manufacture of Spinnakers
5.1 Spinnakers are to be cross cut and all seams are to be sewn together with one row of three step zig zag stitching with each complete step being no greater than 17mm. The thread is to be polyester and impregnated with Ultra Violet inhibitor.
5.2 One leech tabling shall be coloured red and the other green, the
foot tabling
shall be white. The edge tablings shall be not less than 20mm and not
more than 30 mm wide.
5.3 Corner reinforcement patches are to be fitted in all three corners,
and are to be layered using patch cloth of no less than l2oz (IJK) as
under patches, with a top patch of the same material as the rest of the
sail:
5.4 The head tack and clew cringles are to be nickel plated brass size 3 eyelets.
Back to Index
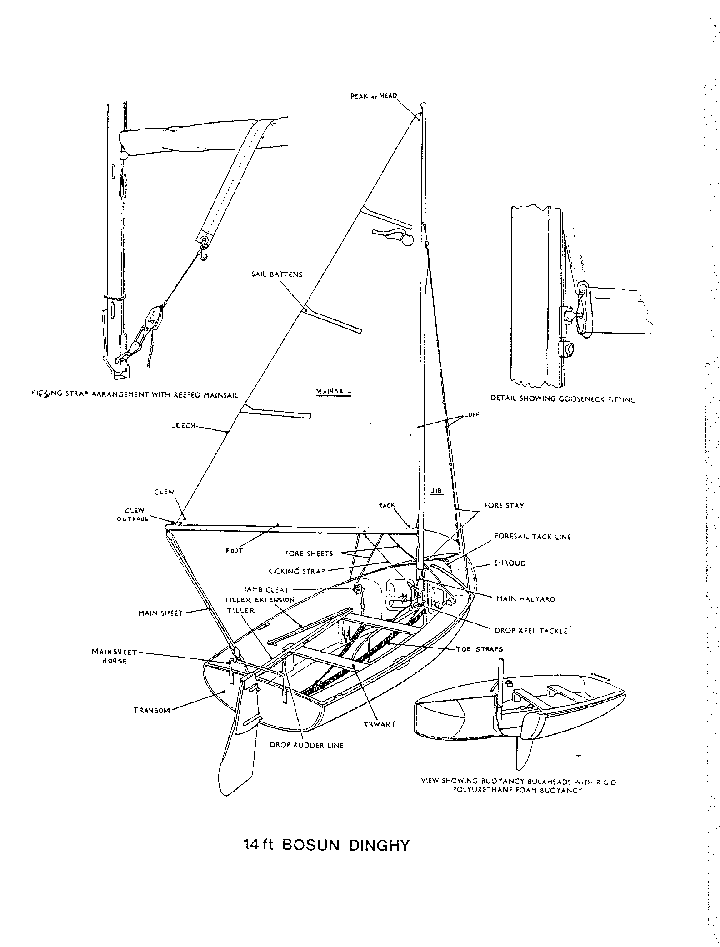
Line drawing of Bosun Dinghy
Back to Index
Notes from the AGM 97
1. The Navy coach had successfully sailed a modified Bosun in a demonstration during the first race of the day and was convinced of the merits of the change both in racing and training terms.
2. The meeting was assembled around the display Bosun and invited to comment and endorse the proposals.
a. Mast spreaders. A simple to fit adaptation with no adjustment required to the length of the stays. They provided excellent stiffening and were sited approximately eight feet above the tabernacle.
b. Revised jib tensioning. A hi-field lever used on an internally rigged halyard, which matched modern usage.
c. Revised stemhead fitting and foredeck arrangement. Without the need to raise and lower the mast while in the water, the deck rack and complex stembead fitting could be replaced with one single fitting, providing a considerable cost saving for new boats (£15 versus £95 approximately).
d. Spinnaker pole stowage. A simple flexed cord arrangement to provide easy access at minimal cost and with quick fitting.
e. Boom outhaul for mainsail. A two purchase external arrangement with a jamming cleat near the mast. There was some discussion of the merits of different purchase arrangements and whether it should be internal or external. The simpler external variant was felt to be more applicable to the Fleet overall and more sophisticated purchase arrangements could wait for further development and future consideration.
f. Mast Gate fitting. An early prototype arrangement was shown which had been most effective on the water and provided an added safety measure to help prevent dis-masting. There was considerable discussion of the measure which was generally welcomed.
3. Measures detailed in sub-paragraphs a. to e. above were endorsed formally and approval was given for measure f. (Mast Gate) to be developed through the Committee. The Chairman thanked everyone for their comments and endorsements noting that this would allow the relevant handbooks and specifications to be amended. He added that it was intended to publicise the changes and make the details available to private owners as well as the sailing centres. This would allow them to upgrade their Bosun if they so wished.
Note 1
Previous approved modifications had included the use of self-bailers and the straight rudder. The horse arrangement could be either the current rails or the original arrangement of a wire strop.
Note 2
The committee, on the advice of the boat builders after hearing of the structural implications to the hull, decided not to proceed with a mast gate modification.
Additional note: Mast gates have now been used in more than one Bosun National Championships
Copyright of Derrick Page - First produced July 1999.
Updated 14th Mar 2011
Copyright of Derrick Page - First produced July 1999.
Updated 14th Mar 2011